Sunday, August 29, 2010

Lemon Lime Bars

I love picnics. They are easy to throw together and always fun. This past weekend I met up with my sister and her friend at Ravinia for a concert. Rodrigo y Gabriela are self taught guitar playing geniuses, mixing classical flamenco music with heavy metal and rock, and the concert was intense. The weather was gorgeous, the stars were out, and the music was beautiful. We set out a blanket and a few chairs, popped a few bottles of wine and settled in. I had picked up a French baguette earlier that day and made salami/pesto/roasted pepper sandwiches and some roasted potatoes, while my sister brought some prosciutto, Brie and crackers. For dessert I brought some grapes and lemon bars.

Lemon Bars

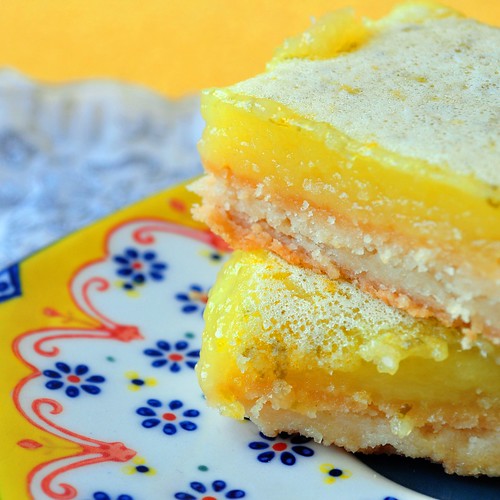
I've never tried making lemon bars before, but I remembered seeing them over at Technicolor Kitchen, and they looked lovely and perfect for a picnic. Plus I had everything on hand, so that morning I rolled up my sleeves (figuratively speaking...I never buy long sleeve tops so I never actually need to roll anything up) and got to work. They didn't turn out as cute as hers, but they were delicious!

Lemon Bars 2

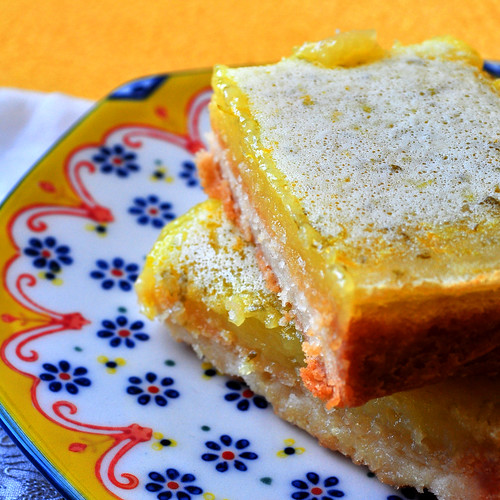
Tangy Lemon Lime Bars
via Technicolor Kitchen

Crust:
1/2 cup (1 stick) unsalted butter, melted
1/4 cup sugar
3/4 teaspoon vanilla extract
1/4 teaspoon salt
1 cup all purpose flour

Topping:
1 cup + 2 tablespoons sugar
3 tablespoons all purpose flour
3 eggs
finely grated zest of 1 lime and 1 lemon
1/4 cup strained freshly squeezed lime juice
1/4 cup strained freshly squeezed lemon juice
powdered sugar for dusting, optional

Preheat oven to 350°F. Line a 9" baking pan aluminum foil leaving an overhang on two opposite sides. Lightly butter the foil.

- In a medium bowl, combine melted butter with sugar, vanilla and salt. Add flour and mix until just incorporated. Press dough evenly over bottom of pan.
- Bake 25 to 30 minutes, or until crust is fully baked, well-browned at the edges and golden brown in the center.
- While crust is baking, stir together sugar and flour in the same bowl you used for the crust (why get more dishes dirty?) until well-mixed. Whisk in eggs. Stir in zest and juices.
- When crust is ready, reduce heat to 300°F, slide rack with pan out and pour filling onto hot crust.
- Bake 20 to 25 minutes longer, or until topping no longer jiggles when pan is tapped.
- Remove from oven to a wire rack to cool completely. Lift up foil liner and transfer bars to a cutting board. If surface is covered with a thin layer of moist foam (not unusual), blot surface gently with a paper towel to absorb excess moisture; repeat with a fresh piece of paper towel if necessary.
- Using a long, sharp knife, cut bars into 16 or 24 daintier bars and sift powdered sugar over bars, if desired. Stored in an airtight container, bars can be refrigerated for up to 3 days.


Today, my sister and I took the leftover bars to my parents house and my mom told us a story. When she was a young college student in Russia, ingredients were very hard to come by. One day she found herself with a bunch of lemons, so she whipped up something very similar to these lemon bars: a simple dessert with a shortbread type crust and a lemon custard topping. She packed it all up and went to visit a friend. Her friend, who was never a great cook and was always broke and therefore hungry, was so incredibly happy and thankful for the sweet treat that she ate most of it right there on the spot. The woman became great friends with my mom, she was the maid of honor at my parent's wedding, and the thoughtful pie gift made such a great impression on her that from that day on whenever my mom would visit her, she'd look expectantly into my mom's hands and ask if there was lemon pie in there somewhere. It is now many many years later, she still lives in Russia, while we've been in the states for almost twenty years, but they still talk once or twice a year. The reason this story came up was that my mom happened to have gotten a call from her friend just that morning, and just a few hours later, lo and behold...lemon bars! What a coincidence! And since she couldn't share the dessert with her friend, my mom ate two pieces: one for herself and one for her friend :)

Saturday, August 21, 2010

Blackberry Wine Jam and a Bit of Silliness

What's that you say? There's been too much jam and not enough booze on this site? Well that's just silly! There was booze in the peach jam, wasn't there? Oh, alright. How about ... more jam with booze! See what I did there? I made me making more jam YOUR idea. I'm sneaky like that.

Blackberries

You see, last weekend I once again braved the great mosquito forest to forage for some berries. Makes me sound kind of like a bear, doesn't it? Moving on. There were no more blueberries left, I guess that season is over around here (boo), but there were still a few raspberries left and great big blackberries just starting to ripen. My friend and I picked a few pints before throwing our hands up in the air and declaring the mosquitoes as the winners of the day yet again. Either that or the "friendly" chicken chased us out. Not sure.

Nope its a chicken

The raspberries went in my tummy, but the blackberries sat in the fridge for a bit. I had thoughts of blackberry peach pies, pretty little tarts and whatnot, but all that requires the use of the oven...and my oven in on summer break. It's too hot. Granted some may argue that making jam isn't exactly "cool" work, but that's neither here nor there, so I made more jam. I was going to make a just-blackberry jam, like this one (aren't those jars adorable?), then I considered one with honey and black pepper, and then I passed a bottle of Pinot Noir as it was trying to sneak out of the house. I grabbed him by the neck, twisted out the cork and poured the contents into a small pot set over a medium flame (minus a glassful for me of course). There'll be no sneaking out of this house!

Blackberry Wine Jam

Do you remember when the movie Chocolat came out many years ago and everyone went crazy over it? The book was being read in every book club. Well, I didn't see the movie or read that book, but I did read every single other book that author has written right then and there. My favorite was Five Quarters of the Orange, but Blackberry Wine came as a very close second and I think that wrapped along with a jar of this jam it would make a lovely gift.

Blackberry Wine Jam with Tea

I've also just discovered that I have been neglecting this author and that she's been very busy these past few years churning out book after book. I guess I'll have to catch up :D

Blackberry Wine Jam with Tea 2

Blackberry Wine Jam
by me
Makes about 13 eight ounce jars of jam.
Note: I added a lot of wine, so the flavor is strong. Feel free to cut the amount down to a cup or two (pre-reduction) for a more blackberry then wine sort of a jam. It will still be wonderful.

5 pounds of blackberries, washed and patted dry
5 cups of sugar (a bit more if your berries aren't very sweet)
5 tablespoons of lime juice
1 bottle of a not too pricey Pinot Noir or really any red wine that you like
1 box of no sugar needed pectin

- Thoroughly clean all of your jars before you start. Sterilize setting on the dishwasher is fine, but you can also boil them or wash with hot soapy water and dry in the oven. Whatever you pick, just keep those suckers super clean.
- Unceremoniously dump all the fruit into a large pot, top with sugar, and pour in the lime juice.
- Set a smaller pot on the stove over medium heat, pour yourself a nice full glass of wine (you'll need something to keep you company while the jam is cooking), and dump the rest into the smaller pot. Simmer until it has reduced to about a third of it's original volume and don't forget to occasionally give it a stir.
- Back to the big pot. Light the fire under it on high and then smash, mash, blend and basically abuse the mixture inside until it gets to the consistency you like. I like mine smoother so I brought out my immersion blender again and brrrrrrr'd the whole thing.
- Stir this often and once it reaches a full boil, stand very close to it (it could boil over if you don't pay attention) and stir stir stir for about 10 min. By now your wine should be nice and reduced, so go ahead and add it to the fruit.
- Dump in the pack of pectin and keep stirring to incorporate. Cook for 2 minutes and then take off the heat.
- Ladle the hot jam into jars, seal and then process in a water bath for 10 min. You should hear most of the jars popping on the counter as they cool, but if the next day there's any that didn't seal, just put it into the fridge and enjoy it over a cup of tea, a good book, and a hot english muffin...of whatever variety you choose ;)

And for those of you who actually read this far, this is what happens when you're trying to take pictures in a tiny kitchen and happen to not possess a single ounce of balance or grace and happen to bump your entire set with your deriere and knock the precariously balanced toast with jam...right into the steaming cup of tea. Makes for a tasty, if somewhat soggy, snack for that very same graceless so-and-so.

Blackberry Wine Jam Ooops

Disclaimer: I am sick and this post was written while under the influence of cold medicine and after several hours of surfing from one children's book illustrator's blog to another. I'm feeling all sorts of loopy and whimsical.

Thursday, August 19, 2010

Vanilla Bourbon Peach Jam

You guys are going to get sick and tired of me and my jam, but I can't help it. Each time the jars cooling on the counter pop, letting me know they're sealed tight for the long haul, my heart skips with joy. Soon there won't be enough toast to support all these jars, but that's why there are friends and holidays and random gifts.

Steph over at Steph Chows is hosting a little jam exchange program. There are still a few days before I know who my exchange partner will be, but in anticipation, I couldn't help but look at all of last years traveling jam jars. While a lot of them looked yummy, one in particular stood out and I saved it to make "in the distant future". Well, welcome to the future.

Vanilla Bourbon Peach Jam 2

With peach season just starting, there are tons and tons of pretty peaches overflowing at fruit stands everywhere at extremely cheap prices. I got about 6 pounds for under $3, pulled up the recipe and got to work on Bean Town Baker's Vanilla Peach Bourbon Jam. Can I just tell you how much I love no sugar needed pectin? The first few jams I attempted were done without any commercial pectin, relying on the fruit and the sugar to set properly, and while it came out good, I was always worried that I'd end up with sauce instead of jam. And the one raspberry jam recipe that I tried to make without pectin came out good, but too sweet for me. This magical box gives me full control over the sweetness of the jam, all while more or less guaranteeing me the perfect set. How great is that?

My peaches were on the firmer side, so mashing them with a potato masher was sort of out of the question, plus I wanted a smoother consistency anyways, so I mixed the fruit with the sugar and lime juice, pulled out what is becoming one of my favorite kitchen tools, my immersion blender, and whipped the suckers into a coarse pulpy consistency. Once the mixture started getting hot, I dumped in the vanilla and stirred stirred stirred like crazy, the rest as they say is history. And now I have a dozen beautiful jars of jam cooling on the counter and emitting loud pops every minute or so to let me know they're settled in to wait for winter.

Vanilla Bourbon Peach Jam

Vanilla Peach Bourbon Jam
adapted from Bean Town Baker
Note: I adjusted the proportions a little bit, so I ended up with a dozen 8oz jars and a bit smaller pectin to fruit ratio, but it still came out fantastic.


Before you begin either wash jars in the dishwasher on the extra hot water cycle, or wash them with hot soapy water and boil them for 10 minutes, leaving them on dry or in the boiling water until you need them for your jam. This sterilizes the jar and lengthens the shelf life of your jam. I ran them through the dishwasher on the sterilize cycle.

1 package no sugar pectin - I used Ball No Sugar needed box
6 pounds peaches
4 cups sugar
6 Tbsp lime juice
1 vanilla bean, split and cut into 1-inch pieces
6 Tbsp bourbon - I used Jim Beam
1.5 tsp almond extract

- The recipe suggests you blanch the peaches in boiling water for 30 seconds, submerge in an ice bath and then slip off the skins, but my peaches were prudes and that method didn't work, so I just used a peeler. Chop the peaches roughly into 1/4 inch dice, removing the pits.

- Put the peaches, sugar, and lime juice into a large non-reactive pot and smash/blend the suckers into a rough pulp using either a potato masher or an immersion blender.

- Put the pot over medium-high heat, add the vanilla pieces and bring the peach mixture to a rolling boil, stirring frequently to prevent scorching. Boil for 1 minute, then add the pectin. Bring the jam to a rolling boil once more, stirring constantly, and boil exactly 1 minute.

- Remove the jam from heat. Stir in the bourbon and extract, ladle the hot jam into jars, and screw on the lids. Then set the jars on a rack in a large pot of boiling water--the water should be 1 inch above the jar tops. I just washed the pot I made the jam in (the only big pot I own), put the jars in, made sure they were under an inch of water and turned it on high.

- Bring the water to a gentle boil and boil the jars for 10 minutes. Then remove the jars from the hot water and set aside to cool. You should hear the lids popping within a few minutes of their bath.

- When the jam is cold, check the seals on the jars by pressing on the centers of the lids. If the lids do not spring back, they are vacuum sealed and the jam can be stored at room temperature. If the lid flexes, there is no seal, so store the jar in the fridge and enjoy it on a bagel in the morning. All of mine sealed, but I'm going to pretend one of them didn't and open it up tomorrow.

Wednesday, August 18, 2010

Caramelized Sugar Rooster Pop

People these days like simplicity. You can see this in one of the recipes I've seen over and over in the different blogs, banana ice cream, which after being featured on The Kitchn is sure to pop up like dandelions. So I figured, why not share with you MY one ingredient recipe? It's not really made that way for health reasons, considering it's candy, but it comes with a lot of nostalgia.

When I was little, the street vendors in Odessa used to sell golden brown and red lollipops. They were hollow inside and came in various shapes, the favorite of which was a rooster. You'd bite into the head and the whole thing would shatter into pieces and then as you scrambled to get all the shards into your mouth, you'd inevitably end up with sticky sugary face and fingers. It was fantastic!

A few years ago, I was experimenting with spun sugar at my sister's house, who kept stealing some of my not so perfect sugar strands and spirals from the counter. I was about to wash the spoon coated in the leftover sugar when with a loud yell she snatched it out of my hand. "It tastes just like those lollipops!" she said, "Leave it and I'll wash the spoon when I'm done".

They don't sell those rooster pops anywhere here in the states and while I don't know how to make blown sugar yet, I did buy a rooster shaped candy mold and made solid caramelized sugar rooster pops for my sister's birthday a few weeks ago.

Rooster Pop

There is only one ingredient as I've mentioned, sugar, and the steps are easy:

- Carefully coat the mold with a very thin coat of vegetable oil (otherwise you're going to have to lick the treats out of the mold) and set aside some lollipop sticks nearby. You don't want to go looking for them while your hot sugar is solidifying.
- Set a bowl with ice water nearby. You'll need it to stop the sugar from cooking once it's ready.
- Depending on the size/number of molds you have the amount of sugar will vary, but to make 4 of the roosters in the picture I needed just a half a cup of sugar.
- Pour the sugar into small pan set over high heat, making sure it's evenly spread out, and don't touch it. Once you see the sugar starting to melt, you can gently nudge it from the outside in with a heat proof spatula, but don't stir or you'll end up with clumps. Keep nudging gently until all the sugar is liquid and has acquired a nice caramel color. Be careful not to walk away, get distracted, or let the sugar get too dark. It will burn and burned sugar smells and tastes gross.
- Once the pan is full of a golden brown sugar syrup take it off the heat immediately and plunge the bottom of the pan into the ice water to stop the cooking for a few seconds.
- Pour the sugar into the molds, stick in the lollipop sticks, rolling them around to make sure they're in there good, and let them cool completely before you pop them out and enjoy.

Note: if you have extra sugar still left in the pan after your mold is filled, you can pour it into shapes on a silpat or spin it into sugar threads. Basically this is your play sugar and you can try out different things with it, just be sure to be extremely careful. This stuff is HOT!

Monday, August 16, 2010

Best Fudgy Brownies

Why don't more people make brownies from scratch? I know that making them from the box seems like the simplest option and I know that they come out pretty good that way too, but the made-from-scratch variety taste so much better and are just as ridiculously easy to make.

Brownies

To accompany my recent ice cream making flurry, I decided to make a homemade caramel sauce and brownies. If you did not heed my advice earlier, the caramel sauce alone is reason to run out and buy David Lebovitz's book, The Perfect Scoop. It's rich and luscious and complex...and when I was done, I could have bathed in it, it looked so good. But I digress, this post is about the brownies. A one pot recipe that yields a pan of rich and fudgy brownies that were almost inhaled on sight, but are even better with toppings.

Brownie a la Whip

A drizzle of caramel and a bit of whipped cream is nice, but slip in a scoop of vanilla ice cream, and maybe a pretzel, and the combination is to die for. I brought the brownies, a tub of ice cream, a jar of caramel, a can of whipped cream and a bag of pretzels to work and told my coworkers to go nuts...there wasn't a crumb left at the end of the day and the jar of caramel was licked clean. They really are that good.

Brownie a la Mode

Robert's Absolute Best Brownies - Doubled
via Ready for Dessert by David Lebovitz
Note: I doubled the recipe because making only a dozen brownies seemed sad and I wanted a full 9x12 pan of these guys. Feel free to halve the recipe if you prefer.

Makes about two dozen, depending on how small you cut them

12 Tbsp unsalted butter, cut into pieces
16 oz bittersweet or semisweet chocolate, chopped
1 1/2 cup sugar
1/4 tsp salt
2 tsp vanilla extract
4 large eggs, at room temperature
1/2 cup all-purpose flour
1 1/2 cup chocolate chips, walnuts, almonds, hazelnuts, or pecans, toasted and coarsely chopped

Preheat the oven to 350°F. Line the inside of a 9x12 inch pan with 2 lengths of foil, positioning the sheets perpendicular to each other and allowing the excess to extend beyond the edges of the pan. Or, use one large sheet of extrawide foil or parchment paper. Lightly grease the foil or parchment with butter or nonstick cooking spray.

In a medium saucepan, melt the butter, then add the chocolate and stir over low heat until the chocolate is melted and smooth. Remove from the heat and stir in the sugar and vanilla until combined. Beat in the eggs one at a time. Add the flour and stir energetically for 1 full minute, until the batter loses its graininess, becomes smooth and glossy, and pulls away a bit from the sides of the saucepan. Stir in the chopped nuts or chocolate chips.

Scrape the batter into the prepared pan and bake until the center feels almost set, about 35 minutes (30 min if you're halving the recipe). Don’t overbake.

Let cool completely in the pan before lifting out the foil or parchment to remove the brownies.

Storage: These brownies will keep well for up to 4 days and can be frozen for 1 month.

Friday, August 13, 2010

Raspberry Jam

Can I brag for a minute? Every once in a while I make a list and spend a day going to thrift stores, garage sales, estate sales, and antique stores searching for treasures. Usually I don't find anything. I'll pick up a few unique items here or there, but it's pretty rare that I find something useful. The last time I ventured out though I got three beautiful French canning jars in great condition and an unopened box of a dozen pint sized Kerr jars with pretty yellow lids! And all they needed was a thorough cleaning, a few new rubber rings and they can start a new life holding pickles and jam in my house. And all together they cost me less then you'd pay for one jar at a store today, so I'm being green and saving money, how cool is that?

Raspberry Jam 3


The point of this though is that yesterday I used up the last of the raspberries I picked a few days ago to make jam and it came out glorious! One of the things I hate the most about the store bought variety is that it's always way too sweet. I know that sugar is probably cheaper then fruit, but if I want raspberry jam, I want it to taste like raspberries, and these were amazing raspberries.

Raspberry Jam

This isn't exactly a recipe. Basically, I just mashed up and weighed all the fruit I had left, added a little less then a cup of sugar for each pound of fruit, squeezed in a couple of lemons and boiled it all with a box of no sugar needed pectin for 10 minutes. I processed the filled jars for another 10 minutes to be sure that it would last.

Raspberry Jam 2

The jam set up perfectly and tastes just like the fresh fruit. I'm already dreaming of a cold December morning, some toast, a bit of butter and this jam still tasting of summer. Sometimes it pays to plan ahead.

Thursday, August 12, 2010

Chocolate Guinness Ice Cream

It has now been just over two years since I have visited and fallen in love with Ireland. To this day whenever I get too frazzled or stressed out, I close my eyes and remember the sense of peace I felt sitting on the beach listening to the waves and the occasional distant braying of sheep, surrounded by miles and miles of green and not a single person in sight. Aaahhhhh.

The Buren from Bishops Quarter Beach

Incidentally, Ireland was the place where I had my first Guinness. I've never been a huge fan of beer, preferring a nice glass of red wine to any of the brews people around me guzzled, but you can't help but get caught up by all the propaganda. So one day while having a quick dinner at a pub, I ordered a pint. Not bad. I'm not saying that right then and there the sky opened up, sunshine streamed down bathing the glass in a golden glow and I became a beer devotee. No, nothing like that, but I have been giving beer a chance more often and I even have a few favorites.

Ice Cream in Connemara

But now it's a season for ice cream, and while I've already had a few ice cream posts, I'm nowhere near done. Last weekend I finally broke down my rule of not buying any more cookbooks (they're taking over my house) and bought The Perfect Scoop: Ice Creams, Sorbets, Granitas, and Sweet Accompaniments by David Lebovitz. Basically all my ice cream recipes were coming from him anyways, so why not just cut out the middleman? Plus, I had a coupon.

Guinness Ice Cream 2

Armed with my new book, I added Chocolate Guinness ice cream to my repertoire, and believe me, you'll want it in yours too. It's smooth and creamy with just a slight hint of the beer bitterness. The perfect thing to create your own little moment of peace.

Guinness Ice Cream

Chocolate Guinness Ice Cream
Adapted slightly from David Lebovitz's The Perfect Scoop

The original recipe calls for milk chocolate, but I never ever have any in my house since I prefer dark and bittersweet, so I used that. I'm sure that using milk would give you a stronger beer flavor, but I liked it just the way it came out. Just be sure to use good quality chocolate since you will definitely be able to taste the difference.

7 oz chocolate, finely chopped
1 cup whole milk
1/2 cup sugar
pinch of salt
4 large egg yolks
1 cup heavy cream
3/4 cup Guinness Stout
1 teaspoon vanilla extract

- Put the chocolate pieces in a large bowl and set a mesh strainer over the top.
- Warm the milk, sugar, and salt in a medium saucepan. In a separate medium bowl, whisk together the egg yolks. Slowly pour the warm mixture into the egg yolks, whisking constantly, then scrape the warmed egg yolks back into the saucepan.
- Stir the mixture constantly over medium heat with a heatproof spatula, scraping the bottom as you stir, until the mixture thickens and coats the spatula. Pour the custard through the strainer over the milk chocolate, then stir until the chocolate is melted.
- Once the mixture is smooth, whisk in the cream, then the Guinness and vanilla. Stir until cool over an ice bath.
- Chill the mixture thoroughly in the refrigerator, then freeze it in your ice cream maker according to the manufacturer's instructions.

If you put a few scoops into a tall glass, you can pour a bit of the leftover Guinness over it and make it into a float. Believe me, it's delicious.

Monday, August 9, 2010

Apricot Almond Tart

Ever since I picked up two pints of the sweet rosy apricots at the farmer's market, I've been scheming about making them into a tart. For two days their future looked dubious, as I kept sneaking one after another from the fridge and eating them. Apricots are one of those fruit that are really only worth eating during their natural season. The stuff you find on the store shelf in the winter time has absolutely no flavor and quite frankly shouldn't even be called an apricot. But these reminded me of when I was little and climbed trees and tasted apricots every day, starting when they were green and right up to the point when they were juicy beyond belief. I'd bring the haul home to my mom using my dress as an apron and after reprimanding me for ruining yet another outfit, my mom would bake. Sometimes they'd get made into a summer fruit punch, but it was always something incredibly delicious and I was quite willing to ruin a dress or two to get the treats.

Apricot Tart 2

My sister was throwing an impromptu dinner party for a few friends and I decided that an apricot tart would be the perfect accompaniment for her cheese platter. Once I saw the pictures of the tart over at
Annie's Eats, my mind was made up and I headed into the kitchen.

This is a very straight forward recipe that comes together very quickly and easily. I decided to quarter the apricots and fan them out in the crust, but then all my hard work got covered up by the almond creme, so I think next time I'll leave them as halves like Annie did. Either way, it was delicious and will definitely be made again.

Apricot Tart


Apricot Almond Tart
via Annie's Eats
Note: Per Annie's suggestion, I also added a tablespoon of sugar to the crust and I think it came out perfectly.


For the crust:
5 tbsp. unsalted butter, at room temperature
3 egg yolks
1 tbsp. sugar
Pinch of salt
1 1/2 cups all-purpose flour
2-4 tbsp. ice water, if needed

For the filling:
8 tbsp. unsalted butter, softened
1/3 cup honey
1 cup ground almonds (blanched or slivered)
2 large eggs
1/4 cup heavy cream
8-10 apricots, halved and pitted

To make the crust, in the bowl of a mixer, beat the butter on medium-high speed until light and fluffy. Mix in the egg yolks one at a time, beating well after each addition. Blend in the sugar and salt. Mix in the flour just until incorporated. Add ice water 1 tablespoon at a time, beating on low speed, just until the dough comes together. Form the dough into a disk, wrap tightly in plastic wrap and refrigerate for one hour.

Preheat the oven to 350˚ F and position a rack in the center. Once the dough is well chilled, transfer it to a lightly floured surface and roll out to fit your preferred tart pan. Transfer the dough to the tart pan and line the pan, pushing the dough into the fluted edges. Trim off the excess dough and patch any holes as needed. Line the pan with a piece of parchment paper or foil and fill with baking beads (rice or dried beans will also work). Bake for 10-15 minutes, until the dough is almost completely baked. Carefully remove the parchment or foil and baking beads.

To make the almond cream, combine the butter, honey, ground almonds, and eggs in a large mixing bowl. Whisk together until well blended and smooth. (This can also be done in a food processor.) Gently fold in the heavy cream with a spatula. Arrange the apricot halves in the partially baked tart dough. Pour the almond cream over the fruit so it fills the tart pan evenly. Bake 25-30 minutes until the almond filling is a light golden brown. Serve warm with a drizzle of honey, if desired.

Friday, August 6, 2010

Stir-fried Eggplant

You know what else we did after we were all hot, sweaty and mosquito bitten but happy with pints and pints of freshly picked raspberries in the car? We cranked up the air conditioning, plugged in the trusty little GPS and went to another farm for veggies! Susies Garden Patch was just a few more miles down the road, past the baby ducks and the funky quail looking critters, past the horses, past the barns, and past the acres and acres of corn and soy as far as the eye can see. I was very close to stealing a cute little yellow fuzzy baby ducky but then I saw the papa duck...and decided to move along.

The veggies on the farm were a little disorganized, but that made hunting for them more fun. They had a bunch of zucchini plants with zucchinis the size of your leg. Those suckers were huge! They had rows and rows of tomatoes, and we made sure to pick up the pretty Roma ones. One or two may have not made it into the basket, memory is a but fuzzy. There was a long row of different kinds of peppers, going from hot peppers to green peppers to purple peppers, but my favorites were the eggplants.

Eggplant Love

I love eggplant, it goes great with everything. Baba ganoush, layered in lasagna, cooked with goat cheese and chorizo, yum! But lately, my favorite recipes are ones that can be made in just a few minutes, and I think I've gotten this one down to 5. How can you beat that? So here it is, my 5 minute meal:

Stirfried eggplant 2

Stir-fried Eggplant
by Me
Serves 2

2 small shiny eggplants, or 2 long Chinese eggplants
A bit of olive oil
A drizzle of soy sauce
A healthy squirt of Hoisin sauce
A touch of Sriracha hot sauce
A generous dash of garlic powder
2 or 3 tablespoons of water
A pretty bunch of green onion for garnish

- Slice the eggplant into even pieces about an inch or two long and maybe a half inch thick.
- Pour a bit of olive oil into a large pan set over medium high heat and layer the eggplant over it.
- As the eggplant starts to cook, open the fridge door and start pulling bottles out. First, pour some soy sauce into the pan, standing a bit back to avoid the possible spatter. Then pull out the Hoisin sauce and draw a few circles with it in the pan. Lastly, pull out the Sriracha hot sauce and add as much as you feel you can handle.
- Sprinkle some garlic powder over the whole thing and add the water.
- Stir everything together to make sure the eggplant is well coated, cover and cook for a few minutes, coming back to stir often, until the eggplant is tender.
- Server over a small pile of steamed rice and garnish with chopped green onion.

Thursday, August 5, 2010

Chocolate Raspberry Ice Cream

We are now in the thick of raspberry season around here and I for one couldn't be happier. I love them in everything. And as you know, berries you picked yourself are a whole heck of a lot better then berries you get at the grocery store. They have a sweeter, deeper flavor and a slightly floral scent. They make your eyes roll into the back of your head, especially when they're still warm from the sun. With that in mind, my friend and I decided to venture out this past Sunday morning and load up.

Raspberries

When we drove up to the orchard my friend had picked there was a sign on the closed gates saying they were closed, so we'll have to try them again next year. I, however, had a backup plan. I found a place about 20 minutes away that had great prices and very flexible hours. Up Berries operates on the honor system, leaving containers and instructions for visitors along with a lock-box to leave money, which makes them open as long as the sun is out.

As you drive up, there's a house and a beautiful old barn by the parking area:

Barn

and since I had my camera handy...

Wheel

But on to the important things: the berries! There was only one other family that was out there picking when we got there, and the bushes were full of ripe berries. What I hadn't counted on was the bugs. Now I don't really mind the beetles and bumblebees, but I cannot stand mosquitoes. It would be an irrational hatred if they didn't treat our every encounter as an attempt to suck me dry.

Raspberries with Bug

An hour and a half later, my friend and I each had full baskets and were ready to go. I had killed about a dozen mosquitoes, but they won this round...I came home with at least 30 bites. We had a lot of fun though and even when our baskets were full we couldn't help stop along the way back to the car to pick just one more...and just another one...and look at that ripe one over there!

Raspberry Pick...Eating

I have plans for jam and pastries, but the first thing I wanted to make was ice cream. When I saw the "I ate it all myself" review for Chocolate Raspberry ice cream at Sea Salt With Food, I knew I had to try it.

Chocolate Raspberry Ice Cream 2

Whoa nelly! This is good stuff. I already promised to share it, but if I didn't you'd find me in a dark corner somewhere in my house with a tub of this ice cream and a spoon, whispering "my preccccioussss".

Chocolate Raspberry Ice Cream

Chocolate Raspberry Ice Cream
via Sea Salt With Food

1 1/2 Cup Heavy Cream
5 Tbsp Unsweetened Dutch-process Cocoa Powder
2/3 Cup Sugar
2 Cups Raspberries, I used fresh, but frozen would be just fine too.

- Whisk together the cream, cocoa powder, and sugar in a large saucepan. Heat the mixture, whisking frequently, until it comes to a full, rolling boil (it will start to foam up). Remove from the heat and add the raspberries. Cover and let stand for 10 minutes.
- Puree the mixture in a food processor or blender. If you wish, press the mixture through a mesh strainer to remove the seeds. I was too lazy and skipped this step, but I think next time I will actually do it. The texture would be so much smoother without the little raspberry bits.
- Allow the mixture to chill thoroughly, then freeze it in an ice cream maker.
- Devour.