Sunday, December 18, 2011

Chocolate Hazelnut Tart and OhNuts!

A few weeks ago I got an email from the nice folks at OhNuts! asking me if I'd like to give their products a try and maybe make something and write about it. Now, I've been placing orders with them off and on for a while now and since I love them, I said "Sure!" They have the best prices and quality for hazelnut flour I'd been able to find anywhere online, so of course I asked for that. They also carry amazing pistachios and pecans, and are quite fast and reliable when it comes to shipping, so if its not too late for your holiday baking, I would definitely recommend them.

Hazelnut flour in hand, it took me all of 5 minutes to decide what to make. My coworker's birthday was going to be that Friday and as she can't have eggs, a chocolate hazelnut tart would make for the perfect treat...well, one of three, but I'll tell you more about the others later.

Hazelnut Chocolate Tart 2

Last year, during that glorious week between Christmas and New Years when stores discount everything and anything remotely seasonal, I got myself a cute oblong tart pan....and promptly forgot all about it. I dug the poor neglected thing out, made a really quick tart crust and caught up on holiday cards while it was cooling. These days between crazy long work hours and holiday related preparations, if I don't multitask I'll never sleep. I'm pretty sure that's true for all of you too.

Hazelnut Chocolate Tart

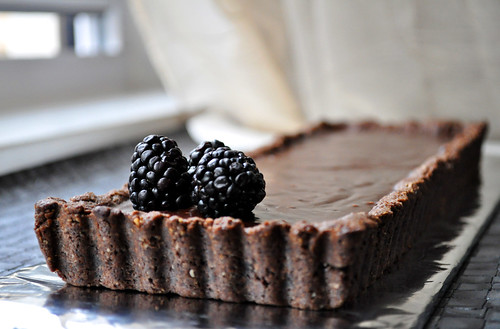
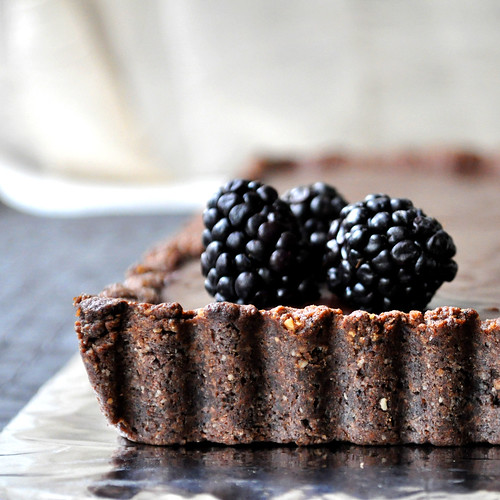
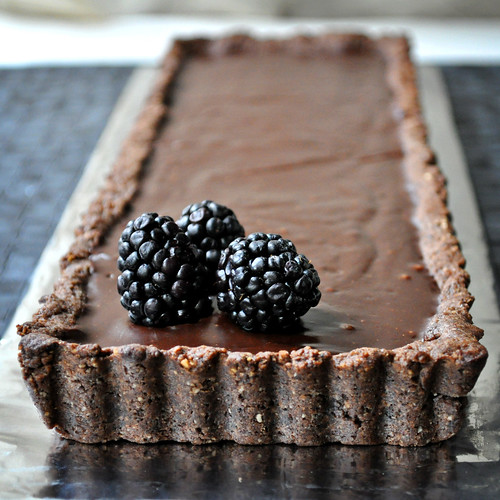
A quick honeyed and lightly spiced ganache got poured into the cooled crust and left on the counter to set overnight. I probably could have popped it into the fridge, but I wanted it to stay a bit on the softer side and there was time till the next day for it to set. In the morning, I slid it into an emptied Scrabble box (the only thing on hand that was the perfect shape for transport) and took it to work, where it most definitely did not disappoint. Despite someone bringing in donuts, and a giant cookie cake and various other sweets, the tart disappeared and not a single crumb remained.

Hazelnut Chocolate Tart 3

Chocolate Hazelnut Tart

3/4 cup flour
1/4 cup whole wheat flour
1/4 tsp salt
1/4 cup sugar
2 Tbsp cocoa
1/4 cup shortening
1 cup hazelnut flour
1/4 tsp vanilla
1/4 cup + 2 Tbsp cold water
8 ounces dark chocolate, chopped
1 cup heavy cream
1/4 cup honey
2 Tbsp unsalted butter
1/4 tsp of ground cardamom or 1 crushed cardamom pod

- In a large bowl, sift together the first two flours with salt, sugar and cocoa. Don't skip this step or you might end up with weird cocoa chunks.
- Use a fork to cut in the shortening until coarse meal texture then add in hazelnut flour and vanilla and stir a few times.
- Sprinkle 1/4 cup of cold water over and mix lightly. If your dough seems dry, add more water a Tablespoon at a time. Mine needed two more, but keep an eye on it. You want it to stick together but not get wet.
- Dump the mixture into the bottom and sides of your tart pan, or pie pan, and chill in the freezer for 20 minutes or so.
- Preheat the oven to 400F while the crust is cooling. Prick crust all over with a fork and bake for about 30 minutes. Check the tart at 20 min, you want it to look dry but not much darker then when you put it in.
- While the tart is cooling, put the chocolate in a medium bowl, and combine the rest of the ingredients in a small pot set over medium high heat.
- Stir the cream until the butter melts and the mixture just comes barely to a simmer, then pour it over the chocolate and let it sit for a few minutes. If you used a whole cardamom pod, pour the mixture in through a sieve to make sure the pod doesn't stay in there.
- Whisk the ganache until it's nice and smooth, pour it into the tart shell and either let it set on the counter overnight or in the fridge for an hour or so before decorating with a few berries and serving.
Note: The tart is pretty rich so a small slice goes a long way.

Monday, December 5, 2011

Leek and Butternut Squash Soup

I hope everyone has a wonderful Thanksgiving. I had plans to pop in and post a recipe or at least send some wishes closer to the holiday, but life and work intervened and I'd been crazy busy. I mean look, it's almost Christmas! Shame on me for abandoning you guys for so long, especially since I've been giving up sleep to squeeze in baking experiments. Before I jump into the sweets though, and I promise that I'll post one or two ideas for the upcoming holidays, I'll give you what I'd been eating all last week. You know what's good to have in the fridge when you're too busy to even order a pizza? A great big pot of soup.

Butternut Squash Soup 2

The wonderful thing about squash is that it can sit in the pantry for quite some time without a single complaint. You can forget all about it right up to the moment you find yourself in front of an empty fridge (to quote my dad "You can ride a bike in there!") looking for some scraps to throw together for dinner that will keep you from once again ordering Thai.

Butternut Squash Soup 3

The soup came together in just a little while and made enough to keep the delivery guy away for a few days. So here's my pre-sugar-coma contribution to myself and to you guys. It's healthy, it freezes well, and it's delicious. Oh, and there's no chocolate in it :D

Butternut Squash Soup

Leek and Butternut Squash Soup
by me, because who has time to search for recipes these days?

2 Tbsp olive oil or a small pat of butter
1 great big butternut squash, peeled and cubed
2 pretty leeks, white stalk sliced
1 plump onion, sliced
2 smallish potatoes, peeled and quartered
2 cloves of garlic, minced
6 cups of your favorite stock, either veggie or chicken will work
a sprig of fresh thyme
salt and pepper to taste

- Pour the olive oil (or butter if that's what you have on hand) into a deep pot set over medium high heat, add your sliced leeks and onion and sautee until starting to soften. Add the garlic and cook until you can smell it, about a minute.
- Add the squash chunks, the potatoes, your stock and your sprig of thyme. I like to keep the thyme whole so that I can fish it out later, but if you don't mind either way, feel free to chop it up. Bring everything up to a low boil, cover and cook until both the squash and the potatoes are fork tender, about 15 minutes.
- Take the pot off the heat and blend the contents to smithereens either with an immersion blender (my favorite tool) or in smaller batches in your blender. Return to pot and add salt and pepper to taste.
- Serve hot in a pretty bowl with an optional dollop or sour cream or drizzle of plain yogurt.

Saturday, November 19, 2011

Chicago Food Film Festival - Suck 'n Shuck

Before I get absorbed in Thanksgiving plans I want to share with you the amazing event I was lucky enough to make it to this weekend:

Program

This would be the 2nd annual Chicago Food Film Festival and I got a last minute ticket to the Suck 'n Shuck event. The idea behind this festival is to feature food related short films and literally giving the festival goers a taste of what they see on the screen. It was held at Kendall College and even before the lights dimmed for the films, the organizers delivered on their promise to give us a taste of what the event was all about. While people were arriving and mingling several appetizers were being passed around. The Arancini, breaded and deep fried rice balls served with a mildly spicy aioli, were delicious:

Arancini

The pulled pork croquettes weren't as picturesque, but they were cooked to perfection and the little cup fit perfectly over my little cup of wine:

Pulled Pork Croquettes

I did switch from the wine to the amazing Jasmine Tea Ginger Ale, made by Fresh Ginger Ale. I'm normally not a fan of ginger ale, but they use fresh ginger in theirs and I love jasmine, so I was intrigued and now I'm sold! Next time I'll give Pomegranate and Hibiscus one a try:

Fresh Ginger Ginger Ale

The lights dimmed and with a brief intro from George Motz, who directed one of the films being shown and was in charge of the post-viewing festivities, the show was on. Some films were better then others, and of course there were commercials from the sponsors before things got started (with a favorite being this one from Chipotle).

The first film was XXX by Joe Pacheo and Stavros Stavropoulos, a 1 minute "canimated" piece on the private bedroom lives of tuna cans and a rogue can of franks. I tried to find you more information about this film online, but couldn't find anything. The film was cute, so if you feel like digging around a bit, it is definitely worth it.

The second film was called Amor Pulpo by John Craig Ross. It's described as a story of an octopus who caught a boat and came to the city where he met the woman who dreamed him to be, and less poetic but more to the point, it shows how this creature goes from the bottom of the sea to your plate in less then 12 hours. I liked the idea and there were some really beautiful shots, but I thought the film itself was a bit lacking on the story-line. A small taste of the dish served in the film was passed around, but it was lacking in flavor and very chewy.

Amor Pulpo

Next up was Zergut by Natasha Subramaniam and Alisa Lapidus, and tells the story of how the moldy and forgotten foods in the back of the refrigerator rise up against the oppression of the fresh foods residing up in front. It was beautiful and perfectly orchestrated to the moody music used. At one point I got a very unsettling feeling deep in my stomach, almost as if I'd be the one cleaning up the mess when the battle was over. I'm kind of happy no food was served with this one.

Pastry Paris, which I saw a few years back in book form, made an appearance. The film sets to music a few of the images from the book, which in turn featured several Parisian landmarks in comparison to their doppelganger French pastries. You can take a look at a couple of them over here on Susan Hochbaum's website. With the film little plates of perfectly buttery and crispy Palmiers (french take on an elephant ears) were passed around. There are no pictures of these because the lights stayed off and I ate mine instead of waiting for a photo op.

There was What's Virgin Mean?, by Michael Davies, which was a funny little take on "the question" that kids ask. It was cute and you should check it out if you've got two minutes.

Fine Cooking magazine submitted a little video called Dinner for Two, which was essentially a how-to video on making a Valentine's Dinner for two, including a salad, vodka spiked lobsters and chocolate pots de creme. Little portions of the latter were passed around for us to try, but again there was no light for taking pictures.

The last film of the evening was The Mud and the Blood, directed by George Motz, told a story about collecting and roasting oysters in the Lowcountry of South Carolina. It was interesting to see how oysters live and grow, plus how loyal the locals are to their harvest.

After the films were over everyone was invited outside for an old fashioned Southern Oyster Boil, hosted by George Motz and his family who brought bags and bags of the very oysters we just learned about, set up a few fire pits outside and steamed them under wet burlap sacks, same as they do back home. I took a million pictures of the process and this being my first boil of any variety, I had a blast shucking oysters, drinking Jameson cocktails, and listening to the live band they brought in for this event.

Steaming Oysters 4

One of the hosts showing us how to shuck oysters, being careful not to cut ourselves on the sharp shells and instructing us to toss the empties into the holes in the middle of the tables, set up just for this occasion.

Oyster Shucking Tutorial

Live Entertainment

I've never had steamed oysters before this, but they were amazing! Not cooked all the way, but slightly warmed through, just to make opening the shells easier, they still had that slippery texture of your regular half-shell variety, but were amazingly flavorful and salty. If you closed your eyes, you could believe you were right there on the coast breathing in the salty breeze.

Steaming Oysters 2

Steaming Oysters

I took way too many shots of the steaming oysters, but outside, with the Chicago skyline in the background and the steam rolling off in waves and the intoxicating smells of salty oysters and the wood logs burning underneath was irresistible.

Oyster Man

Oyster Gang

Oyster Bake

As the oysters finished cooking, the hosts would fill up shovels of them and toss them onto the tables surrounded by eager diners wielding knives.

Hot oysters on the table

Making a mess hasn't been this much fun in a long time...and not just because I wouldn't be the one to clean it up.

Oyster Table - The Aftermath

Oyster Attack

I will definitely be looking for this event next year to see what amazingness they come up with.

Monday, November 14, 2011

Jerusalem Artichoke Soup

It may have snowed here on Friday, but it's been in the 60s the entire weekend, which is bizarre but I'm most definitely not complaining. Despite the heatwave, I'm well on my way to soup season. Last weekend as I was walking up and down every single aisle of the last outdoor farmers market by me for the season, I ran across little baskets filled to the brim with what looked like shiny ginger, but were labeled as Jerusalem Artichokes.

Jerusalem Artichoke Soup

They looked absolutely nothing like regular artichokes and I eavesdropped as the sales guy recommended just roasting them with some olive oil, salt and pepper to the woman ahead of me. Intrigued, I picked out the fullest carton, dragged them home, and then promptly forgot all about them for a week.

Jerusalem Artichokes 2

I found the bag a few days back and luckily they still looked good as new. I'd been roasting everything in sight, so I wanted to do something a little bit different with these and so they went into a soup.

Jerusalem Artichokes
Please ignore my dusty table, Suzy homemaker I will never be.

The wonderful thing about soups is that they're incredibly hard to ruin and super easy to make up on the spot. I normally start mine with some caramelized onions and a few smashed cloves of garlic, but I had a bunch of leeks in the fridge and not an onion in sight, so plans changed. A few tiny potatoes left over from the hasselback experiment went in with peeled sunchokes (another name for the jerusalem artichokes, and one that I like more since in my opinion these tasted nothing like artichokes), a few cups of stock, some seasoning, and a bit of yogurt and dinner was served.

Jerusalem Artichoke Soup 2

Jerusalem Artichoke Soup
Recipe made up by me

2 Tbsp olive oil
2 leeks, trimmed and sliced
4 cloves garlic, smashed or minced
1/2 lb Jerusalem Artichokes (or sunchokes), peeled and halved
2 small potatoes, peeled and quartered
4 cups chicken or vegetable stock
1 sprig fresh thyme, or just a pinch of dried
1/4 cup cream or lowfat yogurt
salt and pepper to taste

- In a medium pot set over medium high heat combine the sliced leeks with the olive oil and cook until they're limp and just barely starting to brown, stirring often. I over-browned mine a bit, which is why my soup came out darker, but it was still good so don't worry if you do the same.
- Add the garlic and stir it in for about a minute, just to get it to mellow a bit.
- Add the sunchokes, potatoes, stock and thyme, bring to a simmer and cook until the potatoes begin to fall apart (about 15-20 min).
- Take the pot off the heat, pull out the thyme sprig, stir in the cream or the yogurt, and blend the soup either in your blender in batches, or in the pot with a stick blender (my favorite tool ever). Adjust the seasonings adding salt and pepper and scoop into bowls. It gets even better the 2nd day, just warm it back up and it's ready to go.

Wednesday, October 26, 2011

Baby Hasselback Potatoes

I feel like almost everyone has given these little babies a try and when a recipe is this easy and looks this great, it's no wonder! You carefully slice a potato almost all the way through, top with some seasonings and bit of olive oil and a sliver of butter and bake. That's it!

Baby Hasselbacks

The layers separate a bit, crisp up on the outside, but stay tender on the inside. And you can do this to almost any potato. Most people use the great big baking potatoes, but I picked up a few heirloom baby potato varieties this past weekend at the farmers market and their golden pink flesh was perfect for this. Sadly, this was the last farmer's market of the year by me, but I've got enough in my pantry to last me a while.

Hasselback Potatoes

Hasselback Potatoes

As many potatoes as you want
Olive oil
Sea salt
Pepper
Garlic Powder
Smoked Paprika
Goat butter (or regular, but I really liked this)

- Preheat the oven to 425F.
- Slice a potato almost all the way through into about 3mm slices.
- Arrange on a baking sheet, drizzle a bit of olive oil, making sure to get some into the cuts.
- Grind some salt and pepper over each potatoes and shake a bit of garlic powder and paprika over them.
- Put a thin sliver of butter over each piece and slide into the oven. About 40 minutes later you'll have beautiful butterflied potatoes ready to eat.

Thursday, October 13, 2011

Roasted Strawberry Ice Cream Sandwiches

Today feels like the first true day of fall around here. The weather outside is murky and drizzly and while it's not yet cold, it's pretty clear that summer is officially gone. And while I love the changing leaves and the oncoming cozy sweater and hot cocoa days, I can't help but hold out for just a few more summer moments.

Strawberries

I picked these strawberries over the summer and froze some for just this kind of a day. Roasting them concentrates and sweetens them, which is good because for some reason this summer the berries were smaller and not as bright as they have been in the past. Adding a drizzle of chocolate balsamic that a friend gave me also helps bring out their flavor and melts into the background helping the ice cream shine.


Roasting Strawberries

I got a box of the Nabisco Brown Sugar Blueberry Thins to try out from FoodBuzz a few weeks back and while they're good, they're a bit too healthy tasting on their own. They are not too sweet, which is nice, and they made the perfect carriers for small scoops of this roasted strawberry ice cream. With a freezer full of summer, I think I'm ready for fall now.

Strawberry IceCream Sandwiches

Roasted Strawberry Ice Cream Sandwiches
Adapted from Zoe Bakes 

2 1/2 cups heavy cream
1 1/2 cups milk, any kind except for skim
1 large vanilla bean, scraped
3/4 cup sugar
1/4 cup light brown sugar
9 yolks

1 pound fresh strawberries
2 tablespoons aged thick balsamic vinegar, I used chocolate balsamic that I got from a friend
2 tablespoons light brown sugar
2 tablespoons corn syrup

A box of Fig Newton Thins (I used Brown Sugar Blueberry) or your favorite cookies

For the Roasted Strawberries:
 - Preheat the oven to 300F.
- Wash and hull your strawberries, but otherwise leave them whole. Toss the berries with the balsamic and sugar and dump everything out on a Silpat covered baking sheet with sides (there will be lots of juice and you don't want it all over your oven). Place the pan in the oven and slowly roast them for about 30-45 minutes, or until the berries get a bit darker red and everything looks mushy and juicy in there.
- Dump everything out of the pan into a bowl, add the corn syrup and either mash or blend everything to get the texture you want. The corn syrup will help keep the ice cream from freezing too hard. Cover the bowl and chill in the fridge for a few hours.

For the Ice Cream Base:
- Heat the heavy cream, milk, vanilla bean and sugars in a medium sauce pan over medium-low heat just until it barely simmers.Turn off the heat and let it steep for 15 min to an hour. The longer you let it sit, the stronger the vanilla flavor will be.
- Bring the cream mixture back to a low simmer.
- Whisk together the yolks in a medium sized bowl. Remove the cream from the heat and whisk a small amount of the cream into the egg mixture, adding enough to warm or temper the eggs, then add everything back into the pot.
- Use a spatula or a whisk to gently stir the custard over low heat. Continue stirring until the mixture starts to thicken.
- Strain the custard through a fine mesh strainer into a bowl and stir in the strawberry puree. Cover the surface of the custard with plastic wrap and let it cool slightly before moving it into the fridge.
- Allow the custard to chill completely, leaving it in the fridge for a few hours, but overnight is best.
- Once the custard is completely chilled, process in your ice cream maker as usual.
- After it's churned, let it firm up a bit more in the freezer before scooping between two cookies and stuffing the whole thing into your mouth.

Monday, September 26, 2011

Black Raspberry Macarons

Over the last month I've been slowly trying to wrap up unfinished projects, purge unused things out of the house and overall just simplify my home and my life. Progress has been really slow and for a long time even though I was getting things checked off the list, the difference was not noticeable, but yesterday night I walked through the house and felt lighter. It's amazing the things you find when you undertake something like this. I have boxes filled with bits and pieces of places and activities from years ago. Things I'd forgotten I'd done and places I'd forgotten I'd been. A trail map from a hike I took with my sister in the middle of nowhere. A ticket stub from a show where my friend and I got drenched and then walked around downtown trying to find a restaurant that wouldn't mind seating us even though we were dripping wet. A set of vintage baking pans I picked up in a tiny town on a weekend trip with a friend. And more unfinished craft projects then I can even begin to tell you. I've been giving a lot of things away (my friend Joy, who I've been piling a lot of my things onto, is starting to joke that I'm slowly taking over her house), but I like the idea of finding my things a good home. I acquired most of them because I liked them and it makes me feel better knowing that someone else will use and love them instead of letting them gather dust in a closet somewhere.

Black Raspberry Macarons 2

I've been going through my pictures and my files on the computer too when I found these. I made this jam this summer when a trip to the farmer's market yielded a case of gorgeous black raspberries. I know it's unfair to post it now, seeing as how raspberries of any color are long since out of season, but as I said, I'm cleaning the rafters. You can always earmark this for next year if you'd like and I'll definitely be making this again next summer.

Black Raspberry Jam 2

If you never had black raspberries you're definitely missing out. They're full of antioxidants, are as dark as blackberries, have the same shape as raspberries, but different from both in taste. Sweeter and not as tart, they just need a bit of sugar and lemon juice to make a beautiful jam. I made macarons using my favorite recipe from Tartlette and filled the shells with this jam, which was amazing, but it would also be lovely on toast or a buttery croissant.

Black Raspberry Macaron

Black Raspberry Jam
3 pounds black raspberries
2.5 cups sugar
1/4 cup fresh lemon juice

- Sterilize about ten 8oz jars by either washing them in hot soapy water and then "cooking" them in the oven for a few minutes, or by running them through the dishwasher on "sterilize" setting (my preferred lazy route).
- Dump the raspberries, sugar and lemon juice into a very large pot set over high heat. You want there to be plenty of room left in there for when the jam bubbles up. Mash the berries with a potato masher until you are happy. I don't mind seeds or chunks in my jam, so I don't worry too much about this, but if you do you may want to sieve or blend the mixture before you start.
- Bring the jam to a hard boil and cook for about 20 minutes, stirring the entire time making sure the bottom doesn't scorch, until it thickens. If you keep a spoon in the freezer you can test your set by dropping a bit of jam into the cold spoon and waiting a minute. If you nudge the chilled jam with your finger and see wrinkles, your jam is done. If it's still runny, keep cooking a few minutes longer and test again.
- Carefully ladle the hot jam into the jars and seal. Process them in a hot water bath for 10 minutes if you want to save them for later or just chill and keep in the fridge if you intend to eat them within the next week or so.

Wednesday, September 21, 2011

Pie Contest and Pie Crust Tips

This past weekend I thought I'd throw my hat into the pie making ring. Never mind that I'm a cake lady and can probably count the number of times I'd previously made pie on one hand. But those earlier pies had come out good, so I was determined that I'd at least try. The event was sponsored by California Raisins, French Pastry School of Chicago, and Pastry Chicago and it was held at the Whole Foods over in Lincoln Park. Have you ever been to that Whole Foods? It's enormous! Apparently it's the 2nd largest store in US, with the biggest being down in Texas. I'm serious, it was huge.

Table of Pies
And some of the pies looked absolutely amazing (nope, none of these are mine):

Pretty Pie
I'm not going to show you what I made, and needless to say, I did not win any of these awesome prizes, but I did learn quite a bit from the whole experience, so I thought I'd make this post informative and share what I learned with you.


Prizes I didn't get
Chef Della Gossett, who currently teaches The Professional Pastry and Baking Program at French Pastry School of Chicago, came out and did a demo on pie making, and I learned more about making a great crust in that half hour then in all the books/tutorials I've read on the subject. I guess I'm a visual learner because watching her, everything just clicked. This post is going to be a bit wordy, but I'm going to try and share with you all the little tidbits that I picked up.

ChefDellaGossett 
I don't have the exact recipe or ratios that she used, and I find that most recipes are basically the same, so the trick is usually in the handling and the process. I can tell you is that the recipe had pastry flour, salt, cold unsalted butter, and some ice water mixed with about a half teaspoon of table vinegar. If you like you can substitute all purpose or cake flour if you don't have pastry flour on hand, just don't use bread flour which has too much gluten for a pie crust. Also, the little bit of vinegar helps prevent gluten from forming, leaving your crust nice and flaky even if you accidentally overwork it a little. Gluten, by the way, is what makes things like bread and pizza dough so nice and chewy, but turns around and makes pie crusts tough and hard. She dumped the flour and salt into the food processor (no pastry cutters here), pulsed a few times, added cold butter cubes, pulsed a few times to get a crumb texture, and then drizzled in the water/vinegar mix while pulsing again, just until the dough started to come together a bit.

Side tip: If you're planning on making lots and lots of pies, or even just want to get ready to make one, measure out everything except for the water and vinegar, put into a ziplock bag and toss in the freezer. When you're ready to make the crust, just empty the pouch into your food processor and you're ready to go.
 
Pie Crust 1
Once things started coming together a little, she dumped everything out onto a lightly floured Silpat and really quickly kneaded everything together into a cohesive dough. The whole thing took less then a minute and when she was done the dough was still cold and you could still make out little bits of butter in the mix. The whole thing got wrapped with Saran Wrap and tossed into the fridge to relax.

Ideally you want to chill the dough for an hour or so, but if you kept yours overnight and it got firmer than you like, just whack it a few times into a disk form with your rolling pin before quickly rolling it out on a lightly floured Silpat. Make sure to roll outward from the center and not back and forth and keep in mind that you want the final shape to be a circle, so rotate the dough a quarter turn every couple of strokes.

Rolling Out Cold Dough
Instead of tucking the dough edges underneath, she neatly trimmed the edges leaving an even inch of overhang all around (the leftovers can be cut into strips, dredged in cinnamon and sugar and baked for munching on later), and folded them inward using her finger as a guide. You can sort of see what I mean in the picture below. I really liked the shape that this made, plus I think it gives you a deeper crust even if you're not using a very deep dish. A deeper crust equals more filling and who doesn't want that?

Crimping Pie Crust
She had the oven preheated to 475F with an inverted cookie sheet set on the middle rack waiting for the crust to be blind baked (baked partially without filling). When you slide in the pie dish, the preheated cookie sheet will make sure that the bottom of the crust cooks faster, preventing soggy/uncooked crust bottoms later on.

I also liked how she used a large coffee filter (filled with pie weights, beans or rice) to line her crust instead of foil, which is what I have been using. The coffee filter absorbs some of the moisture and allows some air circulation making sure that the top of the crust bottom (does that make sense?) browns nicely as well. The crust baked for about 20 minutes and was then taken out and cooled as the filling was being made.

Blind Baking
She filled her pie with chopped apples, raisins infused with cinnamon, and pre-cooked quince. You can use whatever apples you like, or even a mix, just make sure that you pick the kind that don't turn completely to mush during cooking. If you're getting them at your farmers market, just ask the farmer, they'll tell you exactly which ones are the best for what.

The raisins can be infused with almost anything. Della (yes, I got tired of saying "she" so we're on a first name basis now) plopped some raisins into a small pot with some water and a few sticks of cinnamon, brought it to a simmer and set it aside to infuse for about 20 minutes or so. I had attempted to do the same with my pie, but I used rum and I learned that there is such a thing as infusing raisins too much. I left them to soak overnight and they were tiny little booze bombs, so 20 to 30 minutes might be my limit next time around.

Beautiful Cooked Quince
I don't know if you've ever cooked with quince before, but it's a delicious fruit that's unlike anything else. It looks like a cross between an apple and a pear, but it absolutely cannot be eaten raw because it is hard and will suck out all the moisture from your mouth. My mom used to make it into preserves with a few walnuts suspended in delicious syrup, or toss a few into compot, a cooked fruit punch that's amazing both warm and ice cold and is the perfect use of leftover or slightly imperfect fruit. I'll have to tell you guys about it sometime in a different post.

Della peeled, cored and thickly sliced the quince and dumped the peels and the slices into a pressure cooker along with a scraped vanilla bean, two tablespoons of sugar and about two cups of water. You want to keep the peels for the flavor that they add to the mix. The whole thing was sealed up tight, brought to full steam, and then cooked on medium for about 35 minutes. The quince will retain it's shape, but soften a bit and turn this lovely pink color, and your kitchen will smell incredible. Some of the poaching liquid got mixed in with the diced apples and raisins, which got scooped into the crust and topped with the cooked quince slices.

Fill and Bake
The pie went into the oven to cook for about 40 minutes and in the mean time she reduced the quince poaching liquid with a bit of honey into a beautiful glaze that was brushed onto the finished pie.

Glaze and Eat 
How gorgeous is that? And let me tell you, topped with a wisp of whipped cream, it was delicious! The crust perfectly flaky and tender and the filling not too sweet and full of flavor. I'm on a hunt for quince that won't cost me an arm and a leg, and then I'll definitely be making this.  

Monday, September 19, 2011

Corn and Zucchini Salad with Chives and Bacon

The air is finally cooling, the leaves are just barely beginning to change colors, and farmers markets are chock full of amazing fall produce, including almost sugary sweet corn. The hot summer and monsoon-like rains have wreaked havoc on some of the market produce, but the corn has been amazing. I've been visiting different farmers markets over the last few weekends and on my last trip out I found a small table covered in beautiful chives, complete with lovely chive blossoms.

Chives


I scooped up the bunch, a small handful of mint and a few ears of corn and I lugged them home to make this recipe, which I'd bookmarked from The Kitchn a few weeks back. Now I don't know about you, but I find that shaving corn is always a messy process in my kitchen. I know that there are fancy shmancy corn shavers out there, but I just don't think that they deserve valuable drawer space in my kitchen, so I improvise. I usually pick out a nice wide bowl, put an inverted glass into the middle of that, stand my corn on the glass and use my knife to shave the kernels off. That way the bowl catches 98% of the flying kernels and the mess is at a minimum.

Corn


Adding zucchini boosts up the veggie appeal and a few pieces of bacon adds a great smokey flavor, making for a great side dish.

Stir Fried Corn


Corn and Zucchini Salad with Chives and Bacon
adapted from The Kitchn
2 small zucchini, diced
Sea salt and freshly ground black pepper
3 strips of bacon
4 ears sweet corn, kernels shaved off
1 cup minced chives
1/2 cup chopped mint

- Place the diced zucchini in a colander or small bowl and sprinkle lightly with salt. Set aside.
- Heat a deep skillet over medium heat and fry the bacon strips until crispy. Remove the bacon, crumble and set aside. Pour off some of the grease, leaving about a tablespoon or two in the pan. Add the corn kernels and cook over medium heat, stirring frequently, until they are tender or about 5 minutes.
- Drain any excess water off the zucchini (I didn't have very much liquid, but you might) and add to the skillet, along with the chives and mint. Sauté just until the zucchini is barely tender or about 3 minutes.
- Remove from the heat, stir in the crumbled bacon and season to taste with salt and pepper. Serve immediately while hot, or at room temperature.

Sunday, September 4, 2011

Honey and Peaches Ice Cream

I hope you are all enjoying your Labor Day weekend. Down here I've taken the holiday literally. My entire Saturday was filled with work, though don't get me wrong, it was work of the delicious persuasion. My friend and I got up early-ish (I mean it IS the weekend after all) and visited three different Farmer's Markets, ferreting out peaches. My original plan was to drive to a farm and pick our own like I did last year, but then I did the math and between the gas and the three or four hours that such a trip would take, staying close to home and going to the market was sounding better and better.

Peaches Honey and Cream Ice Cream

At one of the markets we hit the jackpot and picked up a full bushel of peach "seconds" for less then half of the normal cost. These were imperfect peaches that didn't look pretty enough to sell for full price, but since we had destined them for ice cream and jam, the look of the peaches didn't matter to us one bit and they were without a doubt at the very peak of ripeness. We also picked up a few pretty peaches for eating, a half bushel of beautiful plum tomatoes, some onions, way too many beautiful garlic bulbs, a still warm baguette, and a slice of pungent blue cheese for my friend and a slice of gorgeous creamy brie layered with apricot preserves and sliced almonds for me. (The work ahead would require a lunch break and we wanted to be prepared.)

Peach

The rest of the day was spent happily in my friend's large kitchen. I made two batches of peach ice cream, roasting peaches with a touch of sugar and raspberry balsamic for one and simmering down some peaches with honey and lemon juice for the other. I made eight batches of roasted tomato sauce base under the strict supervision of my friend, whose recipe this was, roasting tray after tray of quartered plum tomatoes, onions and garlic slathered with a bit of olive oil, salt and pepper. I made a batch of gorgeous peach butter and another batch of golden gingered peach jam (recipes coming soon). At the end of the day I was tired, sore, and sweaty despite the AC that occasionally dripped on my head as I stopped under the vent to wash the dishes, but the house smelled amazing, everything was canned or bagged or frozen, and as I sank into the deep cushy sofa in my friend's back room I felt a deep sense of satisfaction (and my aching back...oof). And so I rewarded myself with a scoop of ice cream.

Peaches Honey and Cream Ice Cream 2


Honey and Peaches Ice Cream

1 1/4 cups heavy cream
3/4 cups whole milk
1 large vanilla bean, scraped
1/2 cup sugar
4 large yolks

6 or 7 ripe peaches, peeled and roughly chopped
1/4 cup honey, I like forest honey for this, but use what you have
1 Tbsp lemon juice

Heat the heavy cream, milk, vanilla bean and sugar in a medium sauce pan over medium-low heat until it's just below simmering, then turn off the heat. Let this mixture sit and steep. The longer you wait, the stronger the vanilla flavor will be. Bring the mixture back to a low simmer once you're ready to continue.

Whisk together the yolks in a medium sized bowl. Pour a cup of the hot cream mixture into the eggs, whisking rapidly the entire time, essentially tempering the eggs so that they don't turn into an omelet in the next step. Whisk another cup of hot cream into the eggs and once everything is warm, whisk the eggs into the pot of remaining cream.

Gently whisk the custard over low heat until the mixture starts to thicken. When the custard seems to be getting thicker, dip a spoon or a spatula into the mix and run your finger through it. It is done when the custard clings to the flat surface.

Strain the custard through a mesh strainer into a shallow dish. Cover the dish with plastic wrap, making sure that the wrap rests directly on the surface of the custard to prevent a skin from forming, let it cool a bit on the counter and then place in the fridge. Allow the custard to chill and thicken overnight or until it's thoroughly cold.

Combine peaches, honey and lemon juice in a large pot and cook on high, stirring regularly, for 20 minutes or until the peaches are so soft that they're starting to puree themselves. Remove from heat, puree, pour into a shallow dish, cover with saran wrap just like the custard and chill.

Once you're ready to churn the ice cream, stir the peach puree into the custard and process the yummy goodness in your ice cream maker according to manufacturers instructions.